Toilet Bowl Drains After Flush Troubleshooting Guide
Water drains from toilet bowl after flushing? This comprehensive guide walks you through identifying the cause and fixing this common plumbing issue. Understanding the flushing mechanism, potential problems like a faulty flapper or fill valve, and the role of water level are crucial to effective troubleshooting.
From basic troubleshooting to complete replacements, we’ll cover all the steps you need to take to resolve the problem. We’ll provide clear explanations, illustrative examples, and detailed tables to make the process easy to follow. Expect to learn the role of various components and how to fix issues like leaks, faulty chains, and improper water levels.
Identifying the Issue
Source: dreamstime.com
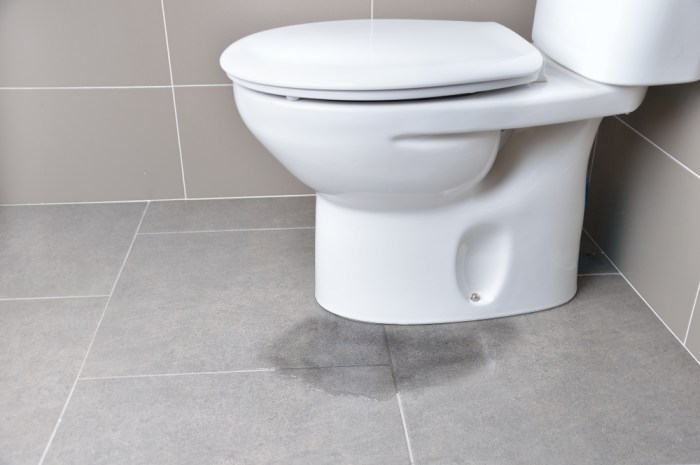
A common plumbing issue encountered in many households is the rapid draining of water from a toilet bowl after flushing. This perplexing problem can stem from various factors related to the toilet’s design, the flushing mechanism, or even the water supply. Understanding the underlying cause is crucial for effective troubleshooting and resolution.
The scenario where water drains from a toilet bowl after flushing presents a significant plumbing concern. This rapid drainage indicates a malfunction in the toilet’s intended function, potentially resulting in wasted water and increased utility costs. Different types of toilets exhibit this issue in various ways, highlighting the need for a thorough understanding of each design’s specific flushing mechanism.
Toilet Types and Flushing Mechanisms
Different toilet types employ various flushing mechanisms. The most common types are the traditional gravity-fed toilet, the pressure-assisted or dual-flush toilet, and the low-flow toilet. These variations in design influence how the issue of water draining rapidly manifests. A gravity-fed toilet relies on the force of gravity to flush water from the tank into the bowl. Pressure-assisted toilets utilize water pressure to aid in the flushing process, while low-flow toilets are designed to conserve water. Each type has specific components and mechanisms that can contribute to the issue if not functioning correctly.
Importance of Proper Water Level
The water level in the toilet tank plays a critical role in the flushing process. An insufficient water level may not generate enough force to effectively flush the bowl. Conversely, an excessively high water level can cause water to drain prematurely or overflow. Maintaining the correct water level, as specified by the manufacturer, is essential for efficient flushing and water conservation.
Analyzing the Problem
| Toilet Type | Symptoms | Potential Causes | Solutions |
|---|---|---|---|
| Gravity-fed Toilet | Water drains quickly after flushing, leaving the bowl nearly empty. | Low water level in the tank, faulty flapper, worn-out chain or linkage, partially clogged drain lines. | Check and adjust water level in the tank, replace the flapper, lubricate or replace the chain/linkage, unclog drain lines. |
| Pressure-assisted Toilet | Water drains quickly after flushing, leaving the bowl significantly less full than expected. | Malfunctioning pressure-assist valve, incorrect water pressure, low water level in the tank, obstructed drain lines. | Check and adjust water level in the tank, ensure adequate water pressure, replace the pressure-assist valve, unclog drain lines. |
| Low-flow Toilet | Water drains quickly after flushing, similar to gravity-fed toilets but potentially with reduced flushing force. | Low water level in the tank, clogged drain lines, worn-out flapper, or other internal components. | Adjust water level in the tank, unclog drain lines, ensure the flapper is properly sealing, potentially replace the flapper or other internal parts if necessary. |
Potential Causes
Toilet water draining after a flush can stem from several issues within the toilet’s plumbing system. Proper diagnosis often involves understanding the function of key components and the symptoms they present. This section will explore common causes and systematic troubleshooting methods.
Understanding the interconnectedness of the flapper, chain, fill valve, and other parts is crucial for identifying the problem. Each component plays a specific role in the flushing mechanism, and a malfunction in any one of them can lead to water draining from the bowl.
Common Causes of Post-Flush Water Drainage
Several issues can cause water to drain from the toilet bowl after flushing. These include a faulty flapper, problems with the fill valve, or leaks in the tank or bowl. The chain and linkage are essential components in the flushing process, and malfunctions in these can also contribute to the issue.
- A faulty flapper is a common culprit. A flapper that doesn’t seal properly prevents the tank from retaining water. This leads to water draining from the bowl as soon as the flush initiates, since the water can flow freely back into the bowl.
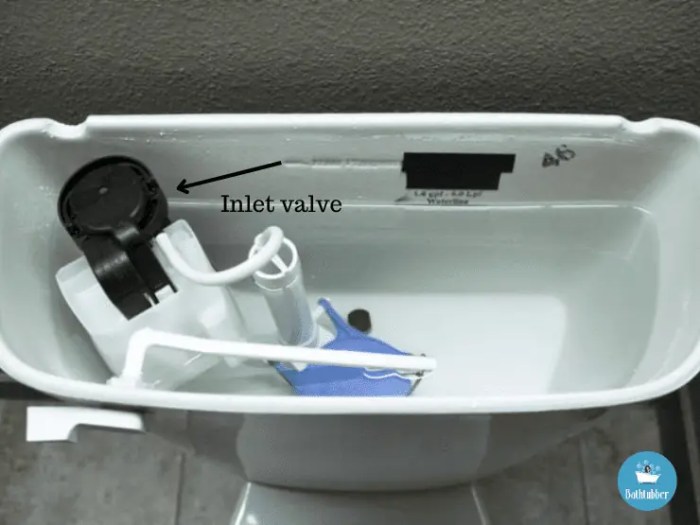
- Problems with the fill valve can also cause drainage issues. A faulty fill valve may not be able to replenish the tank with sufficient water after the flush. The lack of proper water level in the tank can result in a drain in the bowl.
- Leaks within the tank or bowl can result in water loss. These leaks might be hard to spot initially, but the slow drip or constant leak over time will lead to water drainage after the flush.
- Issues with the chain or linkage system can prevent the flapper from properly sealing. A tangled or broken chain might not be able to activate the flapper correctly, resulting in an incomplete seal and subsequent drainage of water.
Diagnosing Flapper Issues
Inspecting the flapper is a crucial first step. The flapper should seal tightly against the tank’s opening when not in use, preventing water leakage. Look for any signs of damage, wear, or debris.
- Visually inspect the flapper for any tears, cracks, or holes.
- Ensure the flapper’s seal is properly seated against the tank’s opening.
- Check for any debris or obstructions in the flapper’s mechanism.
- Replace the flapper if any issues are detected. A worn or damaged flapper should be replaced immediately to prevent continued water loss.
Diagnosing Fill Valve Issues
A fill valve’s function is to replenish the water in the tank after a flush. A faulty fill valve will not maintain the proper water level.
- Check the water level in the tank after a flush. The water level should reach the appropriate fill line.
- Inspect the fill valve for any clogs or blockages that may be preventing water from entering the tank.
- Ensure the float arm is properly aligned and functioning correctly.
- Ensure the fill valve is functioning properly and not leaking.
Systematic Troubleshooting, Water drains from toilet bowl after flushing
A systematic approach to identifying the problem is essential. It often involves checking the flapper, chain, and other components, and then moving on to the fill valve or tank.
| Potential Cause | Symptoms | Troubleshooting Steps | Solutions |
|---|---|---|---|
| Faulty Flapper | Water drains from the bowl after flushing, slow refilling of the tank. | Inspect the flapper for damage, ensure it’s seated correctly, check for debris. | Replace the flapper. |
| Fill Valve Issues | Water level in the tank doesn’t refill to the proper level after flushing, slow refilling of the tank. | Check water level after flush, inspect the fill valve for clogs or blockages, verify float arm alignment. | Clean or replace the fill valve. |
| Leak in Tank/Bowl | Constant dripping, slow water level decrease in the tank. | Inspect the tank and bowl for leaks. | Repair or replace the leaky component. |
| Chain/Linkage Problems | Inability to flush the toilet properly, the flapper doesn’t close completely. | Inspect the chain for tangles, breaks, or obstructions. Check the linkage for proper alignment. | Repair or replace the chain or linkage. |
Troubleshooting Steps: Water Drains From Toilet Bowl After Flushing

Source: dreamstime.com
Troubleshooting a malfunctioning toilet flush involves systematically checking various components within the tank and bowl. A methodical approach is crucial for identifying the root cause and restoring proper function. By following a structured process, you can quickly pinpoint the problem and effect an efficient repair.
A systematic approach to checking each component is key to identifying the source of the problem quickly. This helps prevent unnecessary time and expense by isolating the faulty part. Understanding the function of each part within the flushing mechanism is vital for successful diagnosis and repair.
Inspecting the Flushing Mechanism
A thorough examination of the tank and bowl is essential for locating potential leaks or obstructions. Start by visually inspecting the components for any obvious signs of damage or wear. Look for cracks in the tank, damage to the flapper, or signs of leakage around the fill valve or overflow tube.
Locating and Fixing Leaks
Leaks within the tank or bowl are common causes of slow draining. A common source of leaks in the tank is the flapper, which needs to be replaced regularly. Examine the flapper for any tears or wear and replace it if necessary. Look for leaks around the fill valve or overflow tube. A loose connection or a damaged seal can lead to water seeping out of these areas. Addressing leaks promptly can save water and prevent further damage.
Replacing Flapper and Fill Valve
Replacing the flapper involves detaching the old flapper and attaching the new one. The fill valve regulates the amount of water entering the tank. A faulty fill valve can cause excessive water usage or a complete lack of water in the tank. Consult the manufacturer’s instructions for specific procedures on how to replace both the flapper and the fill valve. This typically involves disconnecting the old components, ensuring proper alignment of the new parts, and reconnecting the plumbing to the tank.
Checking the Chain or Linkage
The chain or linkage connects the flush lever to the flapper. A tangled or broken chain can hinder the flapper’s proper operation, resulting in a slow drain or no flush at all. Ensure the chain is properly attached to the lever and flapper. Check for any obstructions or kinks in the chain that may be preventing proper movement.
Understanding Water Pressure and Air Pressure
Water pressure and air pressure play crucial roles in the flushing mechanism. Adequate water pressure is essential for the water to effectively flush the bowl. Insufficient pressure can result in a weak flush. Air pressure within the tank is also important; it creates a certain level of pressure that facilitates the flushing action.
Troubleshooting Table
| Step | Action | Result | Next Steps |
|---|---|---|---|
| 1 | Visually inspect the flapper for tears or wear. | Flapper is damaged. | Replace the flapper. |
| 2 | Check for leaks around the fill valve and overflow tube. | Leak detected around the fill valve. | Tighten the connections or replace the valve. |
| 3 | Inspect the chain or linkage for obstructions or kinks. | Chain is tangled. | Untangle the chain. |
| 4 | Verify sufficient water pressure. | Low water pressure. | Check the main water supply. |
Solutions and Prevention
Addressing the persistent issue of water draining from your toilet bowl after flushing requires a multi-faceted approach. Identifying the root cause is crucial, as different solutions apply to different problems. This section Artikels common solutions, installation procedures, leak repair techniques, and maintenance strategies to prevent recurrence.
A well-maintained toilet ensures efficient water usage and prevents costly repairs. By understanding the potential causes and implementing appropriate solutions, you can effectively resolve the drainage problem and maintain a functional and economical plumbing system.
Common Solutions
Various solutions are available to address the water draining issue after flushing. These solutions range from simple adjustments to more complex repairs. Properly addressing the cause will prevent the problem from recurring.
- Inspect and Adjust the Flapper: A worn or improperly seated flapper is a common culprit. Replacing the flapper is a straightforward procedure, typically involving detaching the old flapper, removing any debris, and installing the new flapper correctly. Ensure the flapper seals tightly against the tank’s opening to prevent water leakage.
- Check and Adjust the Fill Valve: A malfunctioning fill valve can lead to the water draining too quickly or not filling properly. Inspecting the fill valve for clogs, damage, or improper adjustment is vital. Adjusting the water level or replacing the fill valve if necessary can resolve the problem.
- Locate and Repair Leaks: Leaks within the tank or bowl, such as a cracked tank or a faulty seal, can contribute to the drainage issue. Identifying the leak’s location is key. Repairing cracks or replacing faulty seals can stop the leakage and restore proper water retention.
Installing a New Flapper
The flapper, a rubber or plastic component, controls the flow of water between the toilet tank and bowl. A damaged or incorrectly installed flapper can cause water to drain.
- Gather Materials: Obtain a replacement flapper matching your toilet model. You’ll also need a screwdriver or pliers to remove the old flapper.
- Turn off the Water Supply: Locate the water supply valve for your toilet and turn it off to prevent water from flowing into the tank while you work.
- Remove the Old Flapper: Carefully detach the old flapper from the tank’s mounting mechanism. Inspect the tank opening for any debris that may hinder the proper sealing of the new flapper.
- Install the New Flapper: Align the new flapper with the tank’s opening and secure it to the mounting mechanism. Ensure the flapper seals completely against the opening to prevent leaks.
- Turn the Water Supply Back On: Turn the water supply valve back on slowly to check for leaks. If no leaks occur, you have successfully installed the new flapper.
Fixing Tank or Bowl Leaks
Identifying and fixing leaks within the tank or bowl is essential for preventing water loss. Leaks can cause the water level in the tank to drop, resulting in incomplete flushing and subsequent water drainage.
- Check for Cracks or Damage: Inspect the tank for any cracks, chips, or damage that might be allowing water to seep out. Carefully examine the base of the tank for any cracks. Check the overflow tube and ensure that it is not blocked or leaking.
- Repair or Replace Damaged Components: If you locate a crack or damage, consider patching it with epoxy or replacing the damaged component. Consult a plumber for more complex repairs if necessary.
Importance of Regular Toilet Maintenance
Regular maintenance of your toilet is crucial for preventing future issues. Regular inspection and cleaning can identify potential problems early on, helping to avoid costly repairs.
- Regular Flushing Checks: Periodically check if the toilet flushes properly and if the water level in the tank is appropriate. Note any signs of leaks or slow drainage.
- Cleaning the Tank and Bowl: Cleaning the tank and bowl regularly can prevent clogs and buildup that could affect flushing efficiency.
- Inspecting the Flapper and Fill Valve: Inspect the flapper and fill valve for wear and tear or damage. Replace worn parts promptly to prevent water leakage.
Preventing Recurrence
To avoid the water draining issue from recurring, proactive steps are essential. These steps focus on minimizing wear and tear and maintaining optimal toilet function.
- Avoid Overfilling the Tank: Overfilling the tank can strain the system and increase the likelihood of leaks.
- Check for Clogs Regularly: Periodically check for clogs in the drain line or bowl to prevent water from draining too quickly.
- Use Appropriate Toilet Paper: Using excessive or inappropriate toilet paper can lead to clogs and blockages.
Troubleshooting Table
This table summarizes common toilet drainage problems, their solutions, necessary materials, and the steps involved.
| Problem | Solution | Materials Needed | Steps |
|---|---|---|---|
| Water drains from bowl after flush | Replace flapper | New flapper, screwdriver | 1. Turn off water, 2. Remove old flapper, 3. Install new flapper, 4. Turn water back on |
| Water drains too quickly | Adjust fill valve | Screwdriver, adjustable wrench | 1. Turn off water, 2. Adjust fill valve, 3. Turn water back on |
| Leak in tank | Repair or replace tank | Epoxy, replacement tank | 1. Locate leak, 2. Repair/replace, 3. Test for leaks |
Illustrative Examples
Source: dreamstime.com
Toilet bowl issues can stem from various factors. Understanding the specific cause is crucial for effective troubleshooting. These examples will illustrate common problems and their solutions, helping you pinpoint the source of your drain woes.
Flapper Malfunction
A flapper, the rubber or plastic seal that controls the water level in the toilet tank, can cause slow draining. If the flapper is worn, damaged, or not sealing properly, water will slowly leak out of the tank into the bowl, resulting in a slow drain.
Visual Representation of Flapper Function
Imagine a small, hinged door at the bottom of the tank. This is the flapper. When the toilet is flushed, the flapper opens, allowing water to flow into the bowl. Once the flush cycle is complete, the flapper closes, sealing the tank and preventing water from draining. A worn or broken flapper may not close properly, allowing water to seep into the bowl continuously. A proper flapper should have a firm seal and a tight fit to the tank opening, ensuring a quick and complete water transfer during the flush.
Replacement Instructions
To replace a faulty flapper, first turn off the water supply to the tank. Locate the flapper and carefully remove it from the tank. Take note of how it was installed. Select a replacement flapper that is compatible with your toilet model. Position the new flapper correctly in the tank and ensure it fits tightly to the opening. Reconnect the water supply and check for proper sealing.
Tank Leak
Leaks within the toilet tank can also lead to continuous water drainage into the bowl. Various areas within the tank are susceptible to leaks.
Visual Representation of Tank and Potential Leak Points
Imagine a rectangular container with an inner portion where water is held. This is the toilet tank. Potential leak points include the water supply connection, the fill valve, the overflow tube, and the base of the tank itself. A leak at any of these locations can cause a slow drain and a consistently low water level in the tank. The overflow tube is a vital safety mechanism that prevents water from overflowing the tank, preventing damage to the toilet and floor.
Troubleshooting Tank Leaks
To find a tank leak, carefully inspect the tank for any wet spots, especially around the fill valve, overflow tube, and water supply connections. Run water in the tank and observe for any drips or unusual noises. Use a flashlight to inspect areas that are hard to see directly. A slow trickle of water can often be detected by the sound.
Fill Valve Malfunction
A malfunctioning fill valve can also be a culprit. The fill valve is responsible for regulating the water level in the tank.
Function and Repair
The fill valve, usually located near the bottom of the tank, controls the inflow of water into the tank after a flush. It typically has a float mechanism that stops the water flow once the tank reaches the desired level. If the valve is faulty, it may allow water to continuously enter the tank, leading to a slow drain. A faulty fill valve can be repaired by replacing the float or the valve itself. Check for any damage or obstructions in the valve mechanism. Ensure the float is functioning correctly to regulate the water level.
Faulty Chain or Linkage
A faulty chain or linkage that connects the flush handle to the flapper can cause issues with proper flapper closure.
Visual Representation of Chain and Linkage
Visualize a chain or a series of levers and connecting rods. This is the chain and linkage that connects the flush handle to the flapper mechanism. A damaged or tangled chain or a faulty linkage can prevent the flapper from closing completely, resulting in a slow drain. A broken or bent linkage component will prevent the flapper from returning to its proper position, resulting in an improper seal.
Importance of Proper Water Level
Maintaining the correct water level in the tank is critical for efficient flushing.
Visual Representation of Correctly Filled Tank
Imagine the tank with water filling it to a specific level, just below the overflow tube. This optimal level allows the flapper to seal properly and provides enough force for a complete flush. An insufficient water level can cause weak flushing, while an excessive level can lead to water overflowing and wasting water. The proper water level is essential for efficient flushing and minimizing water usage.
Ultimate Conclusion

Source: lifehacker.com
In summary, resolving water draining from a toilet bowl after flushing involves a systematic approach to identify and address the root cause. This guide provides a detailed roadmap, encompassing diagnostics, troubleshooting, and solutions, ensuring your toilet functions optimally. Remember regular maintenance is key to preventing future problems, keeping your toilet in tip-top shape for years to come.